 Tweet
Tweet
Hi. I've been debating this topic for a while and I have yet failed to convice Vlado there's something not right with this material. Or maybe it's just me failing miserably at using it the way it's supposed to be used, in which case I'd be more than happy to learn the proper setup of it. 
So what is the 2sided material?
That being said about the material, we have established a few testing criteria:
• The material is used for simulating thin translucent materials like paper etc.
• You can assign different materials to the front and the back side of the material.
• The material is to be used on single polygon objects - objects without thickness.
First the real life study.
I set up a simple studio in my home. One single light (a table lamp with a 75w halogen bulb). A black table minimizing the reflected light from below. A white wall giving some diffuse light to the scene.
I used three test objects. The first being a single sheet of noteook paper painted green with a marker on one side with the text "FRONT" written at the bottom left. The back of this sheet is left unpainted, and instead marked with the text "BACK" in the bottom left.
The second test object is a sheet of the same kind of paper. This time a funny face is drawn on it with a ballpoint pen. Same texts "FRONT" and "BACK" are painted in the same place.
The third test object is a stack of four of the same kind of paper. This is to illustrate the opaque properties of the paper (comparable to a using a standard material in the render).
Two tests are conducted:
1. Front towards camera - How does the paper look from the front with no backlight (laying on the black table) and when it is lit from behind with as little front light as possible?
2. Back towards camera - How does the paper look from the back under the same conditions?
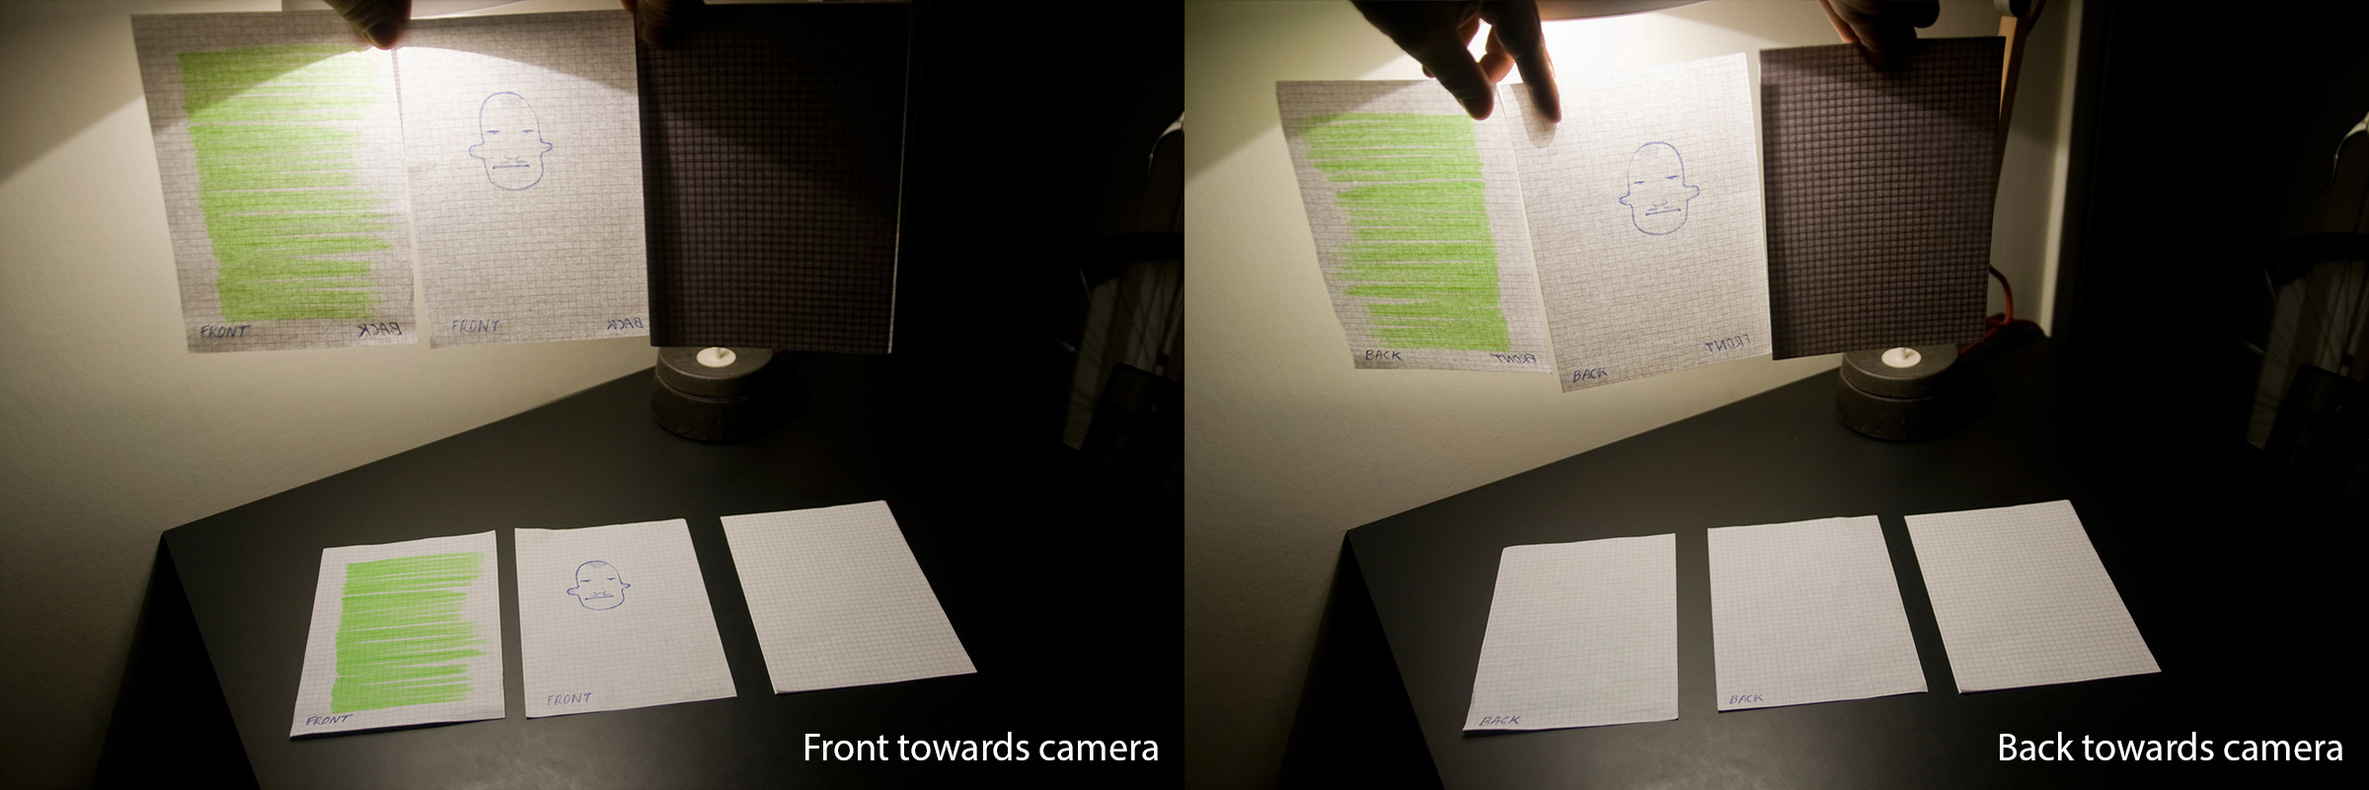
In photo #1 you can see how the papers on the table show almost nothing of the backside component - you can just barely make out the text "BACK" in the lower right corner. The green patch and the face is clearly visible, and the whiteness of the paper is almost the same as the opaque bunch of papers on the far right.
When backlit you can clearly see the text "BACK" shining through, and you can still make out the green and the face. The "opaque" bunch of papers have a slight shine-through of light. (I should've used more papers for this one really.) If you look at the top right corner of these papers, which is almost completely black, meaning hardly any light is hitting them from the front.
In photo #2 you can see the backside of the papers. Note how the green patch and the face is just barely visible when laying on the table. When backlit, they look almost as they do in photo #1 - only difference being the front side image is slightly dimmed.
Now for the renders.
I constructed a scene to mimic the situation in my home studio. I modelled paper objects to mimic the real life papers. Textures looking like they do in the photos were also created.
I use three different Vray2sidedMtl for the papers. One with the green front, and a white backside. One with the face, and with a white backside. One with a clear paper texture, used as both back and front material. The translucency in these renders is set to 64RGB. (Using numbers over 128 will really make this look weird.)
In the render, the papers laying on the table look quite ok. However, the papers are a lot less similar to the opaque stack of papers when compared to the situation in the photo - they appear a lot darker in the render. This effect increases as you raise the level of translucency.
When backlit, you can now ONLY see the back facing material, and NONE of the front facing. In the photo the backlit papers look almost identical no matter the orientation of the paper to the camera.
I have tried changing translucency, but the that does not change the fact that the front facing texture is completely ignored when the paper is backlit.
Other attempts
Turning the problem around, and instead tring to recreate what's in the photo using other techniques, I've tried a few solutions. One, which... almost succeeds, is shelling the object and using different 2sided materials (with the same back and front materials) on the different sides. It kind of works, but the backlit image is blurred and dimmed significantly, and the render takes a bit longer. This really isn't very useful. Image below.
Using the 2sided material without the extra back material
This is easily the best way to use the 2sided material - as long as you keep the translucency fairly low. In the renders below the translucency is first set to 96RGB and in the second image set to 255. The first render looks ok, but in the second one the papers laying on the table go almost completely black. I guess the only conclusion you can make of this is that you will have to keep translucency very low when working with materials like paper, or you will get unnaturalistic renders. This also removes the option of having two different sides of the material, unfortunately. Images below.
So what can we make of all this?
To me, it looks like the 2sided material fails at rendering thin objects the way they appear in real life. I have tried countless setups to recreate what I captured in camera, and have still not been able to do get it right.
In the photos, it is quite obvious that the backlit side is "added" to the other side of the paper, with only a slight loss of light due to the paper's light absorbing structure. From the discussion the "V-ray leaves"-thread, this would break the energy conservation principle, but I'm sure there should be some way of describing this correctly in code.
Using the 2sided material without a special backside material, and at a reasonable translucency works satisfactory right now. The material can be used to make leaves that look kind of right. What I hope for though is that vray will one day have a material that works just like reality, with no need for lots of special tweaks.
I urge anyone interrested in this to download the scene and check it out - here. Maybe I've made a fatal flaw somewhere, and if anyone can make it work, no one would be happier than I.
It might be noted there are more aspects concerning real life thin object refraction which isn't discussed here, like that happens when you shine a backlit object with an even brighter light from the front (which works rather well with the 2sided material, yet it behaves oddly). There's also the discussion of how the 2sided material deals with different levels of reflection on different sides.
Sorry for going on and on about this, but having a 2sided material that acts just like a real thin, translucent object would solve a lot of problems, speed up work and improve render quality a great deal. Looking forward to seeing your attempts, and to reading the replies from ChaosGroup. Cheers!
So what is the 2sided material?
Originally posted by spot3d.com
• The material is used for simulating thin translucent materials like paper etc.
• You can assign different materials to the front and the back side of the material.
• The material is to be used on single polygon objects - objects without thickness.
First the real life study.
I set up a simple studio in my home. One single light (a table lamp with a 75w halogen bulb). A black table minimizing the reflected light from below. A white wall giving some diffuse light to the scene.
I used three test objects. The first being a single sheet of noteook paper painted green with a marker on one side with the text "FRONT" written at the bottom left. The back of this sheet is left unpainted, and instead marked with the text "BACK" in the bottom left.
The second test object is a sheet of the same kind of paper. This time a funny face is drawn on it with a ballpoint pen. Same texts "FRONT" and "BACK" are painted in the same place.
The third test object is a stack of four of the same kind of paper. This is to illustrate the opaque properties of the paper (comparable to a using a standard material in the render).
Two tests are conducted:
1. Front towards camera - How does the paper look from the front with no backlight (laying on the black table) and when it is lit from behind with as little front light as possible?
2. Back towards camera - How does the paper look from the back under the same conditions?
In photo #1 you can see how the papers on the table show almost nothing of the backside component - you can just barely make out the text "BACK" in the lower right corner. The green patch and the face is clearly visible, and the whiteness of the paper is almost the same as the opaque bunch of papers on the far right.
When backlit you can clearly see the text "BACK" shining through, and you can still make out the green and the face. The "opaque" bunch of papers have a slight shine-through of light. (I should've used more papers for this one really.) If you look at the top right corner of these papers, which is almost completely black, meaning hardly any light is hitting them from the front.
In photo #2 you can see the backside of the papers. Note how the green patch and the face is just barely visible when laying on the table. When backlit, they look almost as they do in photo #1 - only difference being the front side image is slightly dimmed.
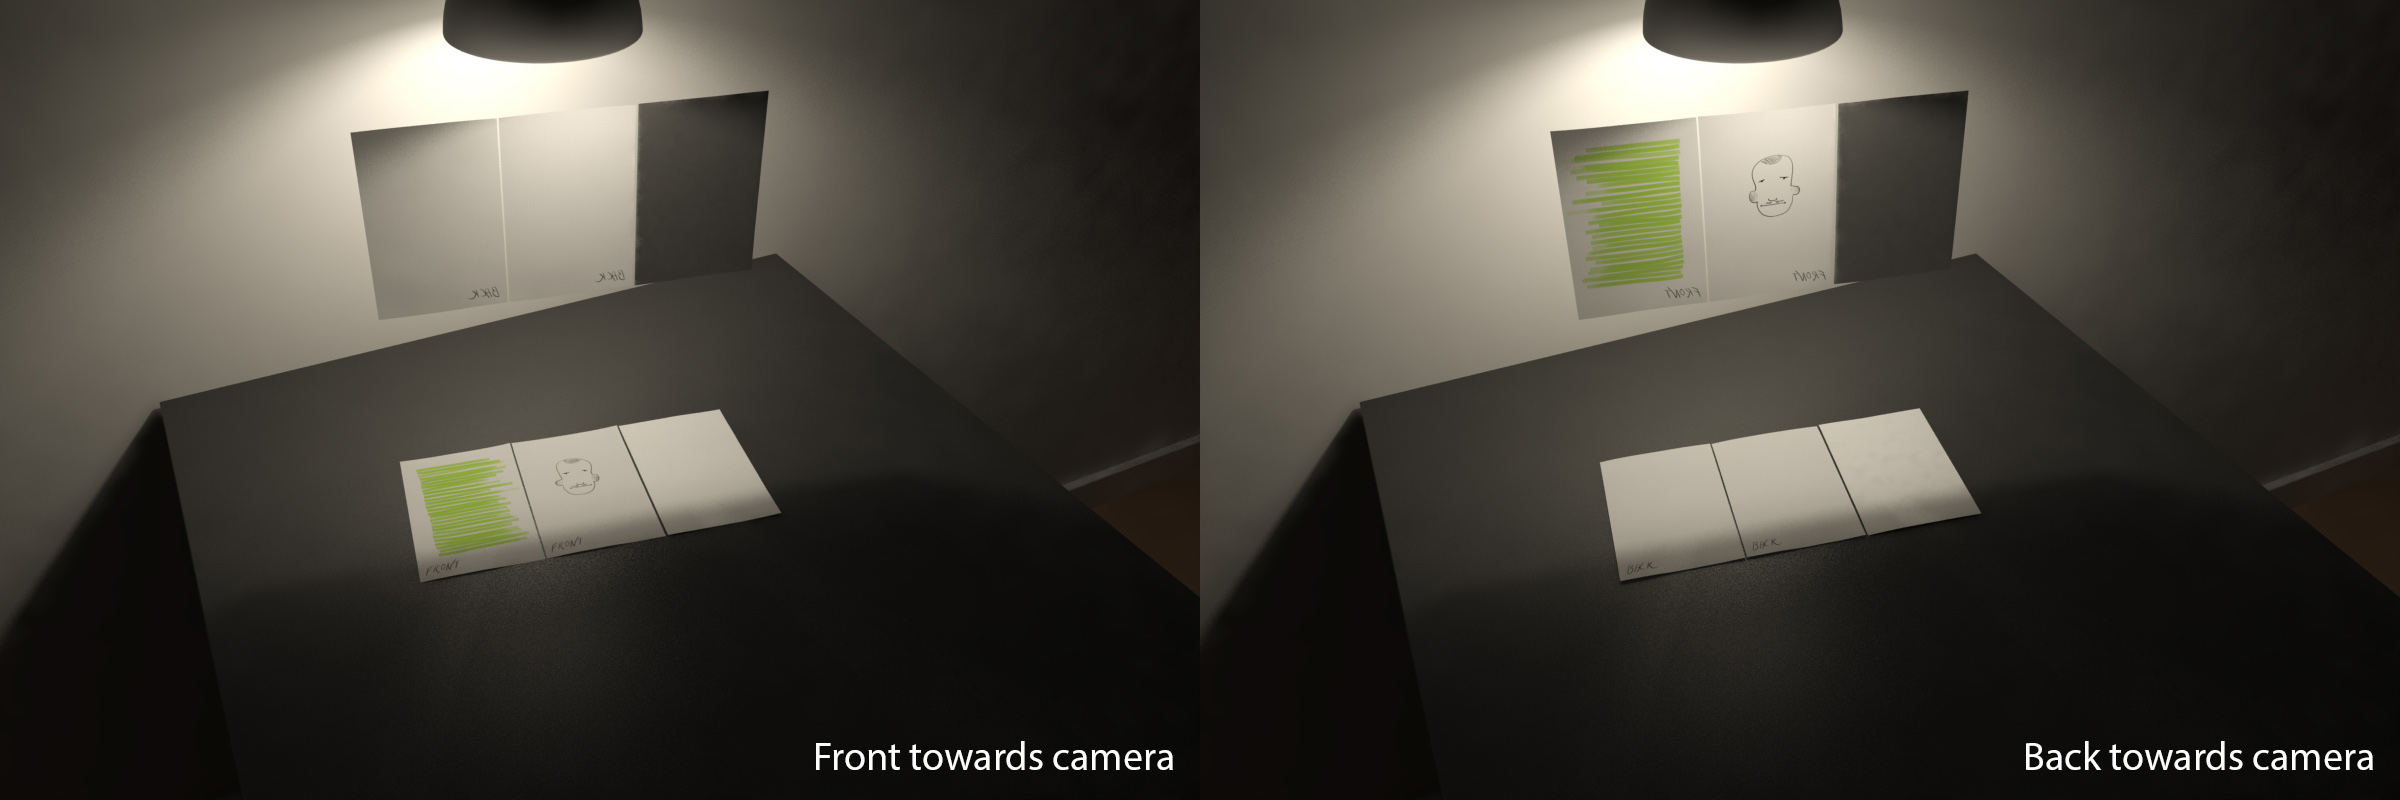
Now for the renders.
I constructed a scene to mimic the situation in my home studio. I modelled paper objects to mimic the real life papers. Textures looking like they do in the photos were also created.
I use three different Vray2sidedMtl for the papers. One with the green front, and a white backside. One with the face, and with a white backside. One with a clear paper texture, used as both back and front material. The translucency in these renders is set to 64RGB. (Using numbers over 128 will really make this look weird.)
In the render, the papers laying on the table look quite ok. However, the papers are a lot less similar to the opaque stack of papers when compared to the situation in the photo - they appear a lot darker in the render. This effect increases as you raise the level of translucency.
When backlit, you can now ONLY see the back facing material, and NONE of the front facing. In the photo the backlit papers look almost identical no matter the orientation of the paper to the camera.
I have tried changing translucency, but the that does not change the fact that the front facing texture is completely ignored when the paper is backlit.
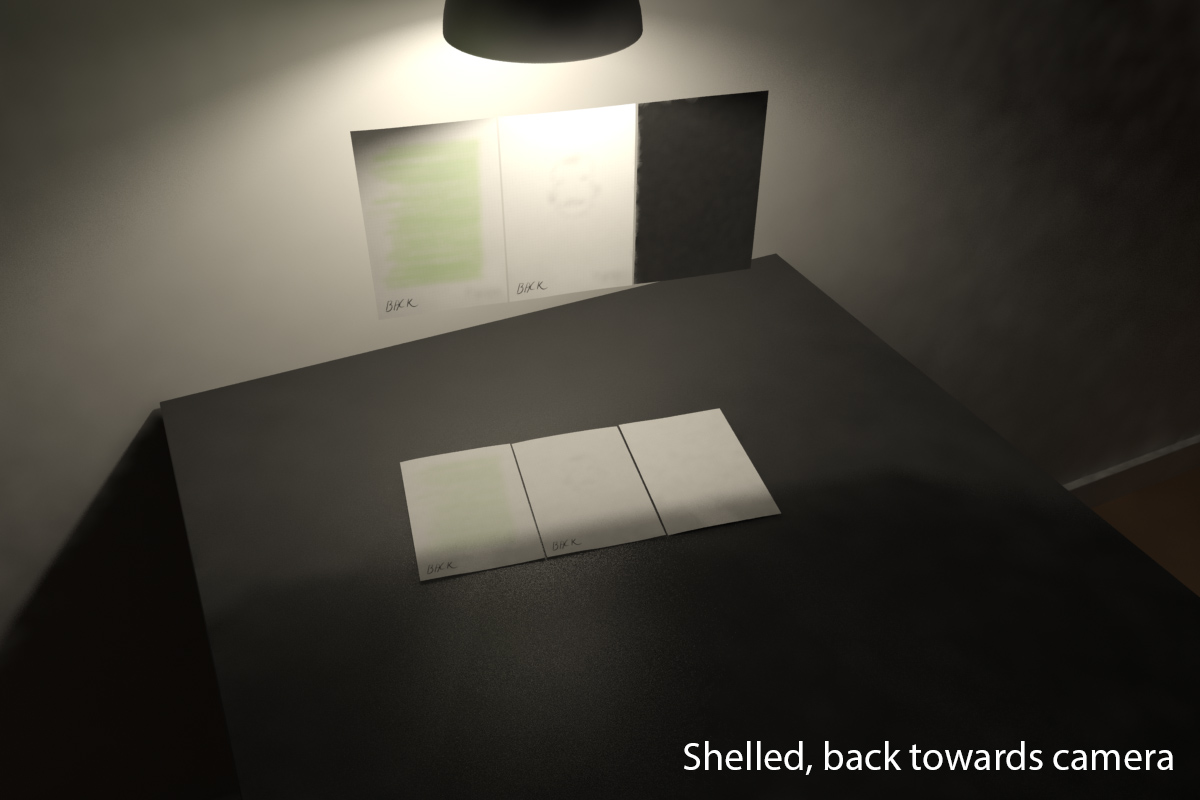
Other attempts
Turning the problem around, and instead tring to recreate what's in the photo using other techniques, I've tried a few solutions. One, which... almost succeeds, is shelling the object and using different 2sided materials (with the same back and front materials) on the different sides. It kind of works, but the backlit image is blurred and dimmed significantly, and the render takes a bit longer. This really isn't very useful. Image below.
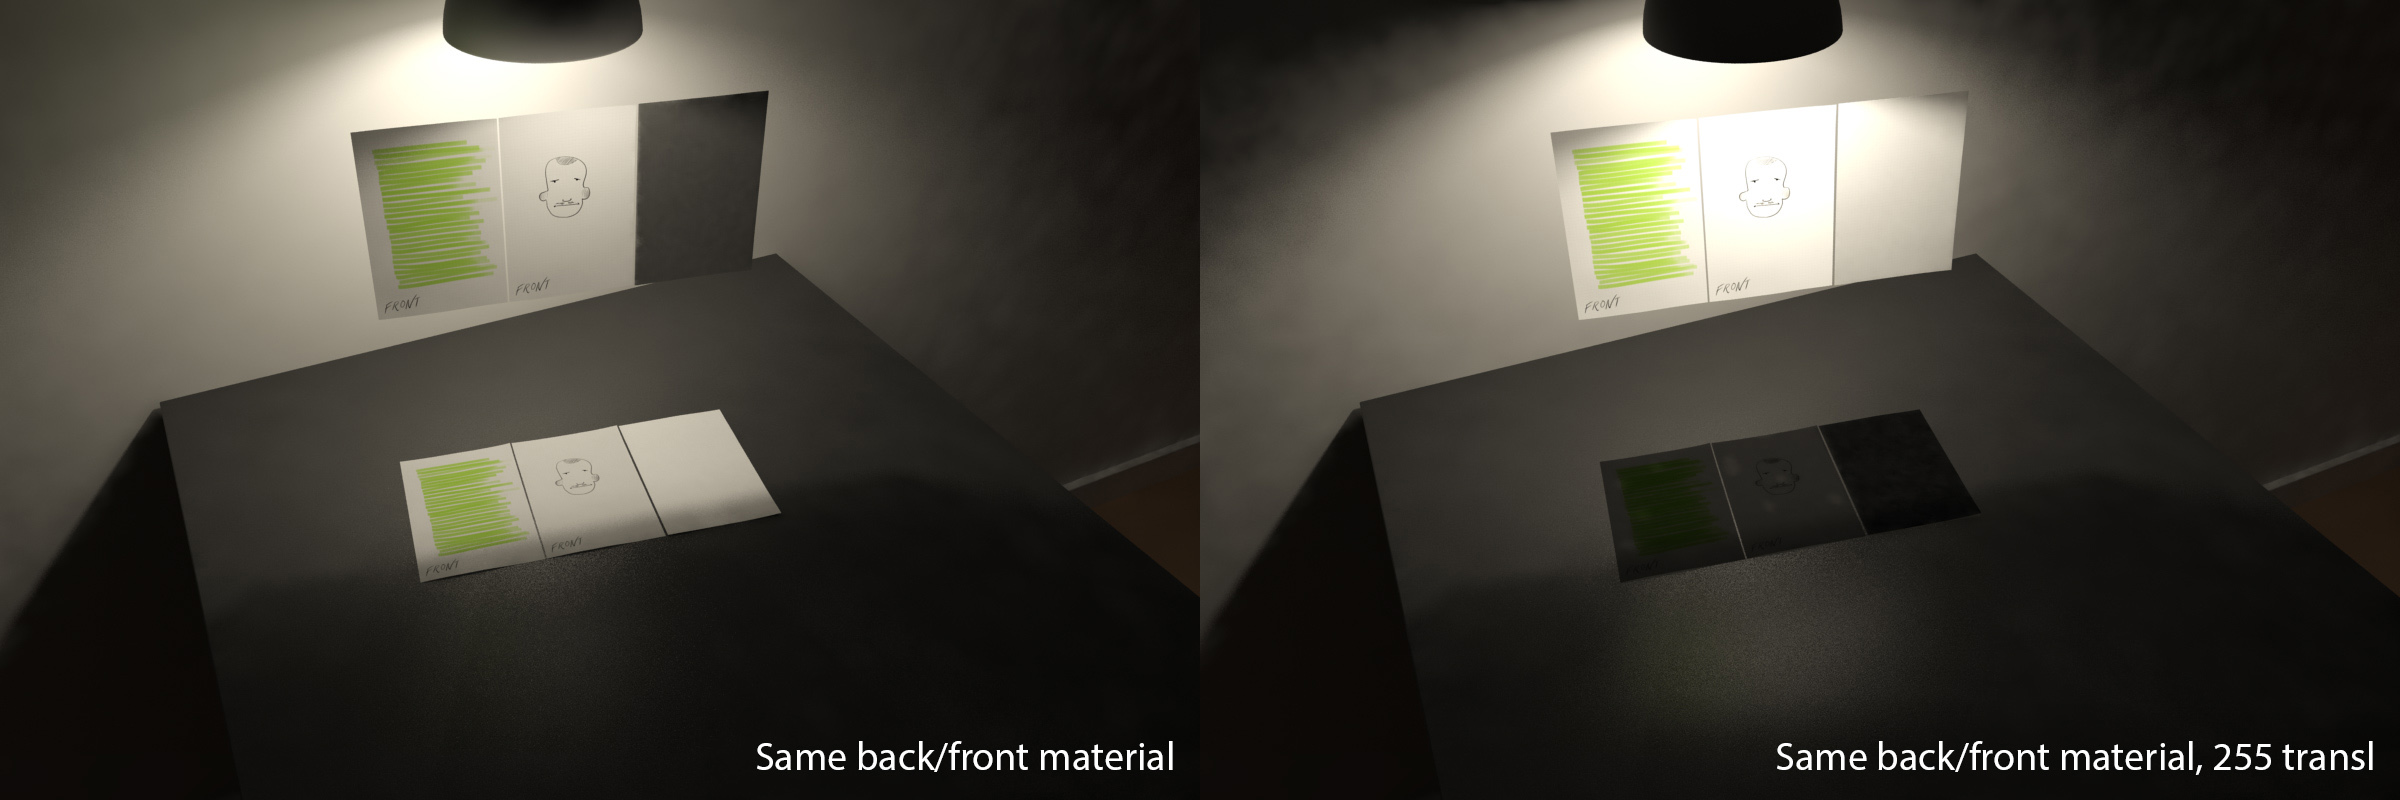
Using the 2sided material without the extra back material
This is easily the best way to use the 2sided material - as long as you keep the translucency fairly low. In the renders below the translucency is first set to 96RGB and in the second image set to 255. The first render looks ok, but in the second one the papers laying on the table go almost completely black. I guess the only conclusion you can make of this is that you will have to keep translucency very low when working with materials like paper, or you will get unnaturalistic renders. This also removes the option of having two different sides of the material, unfortunately. Images below.
So what can we make of all this?
To me, it looks like the 2sided material fails at rendering thin objects the way they appear in real life. I have tried countless setups to recreate what I captured in camera, and have still not been able to do get it right.
In the photos, it is quite obvious that the backlit side is "added" to the other side of the paper, with only a slight loss of light due to the paper's light absorbing structure. From the discussion the "V-ray leaves"-thread, this would break the energy conservation principle, but I'm sure there should be some way of describing this correctly in code.
Using the 2sided material without a special backside material, and at a reasonable translucency works satisfactory right now. The material can be used to make leaves that look kind of right. What I hope for though is that vray will one day have a material that works just like reality, with no need for lots of special tweaks.
I urge anyone interrested in this to download the scene and check it out - here. Maybe I've made a fatal flaw somewhere, and if anyone can make it work, no one would be happier than I.
It might be noted there are more aspects concerning real life thin object refraction which isn't discussed here, like that happens when you shine a backlit object with an even brighter light from the front (which works rather well with the 2sided material, yet it behaves oddly). There's also the discussion of how the 2sided material deals with different levels of reflection on different sides.
Sorry for going on and on about this, but having a 2sided material that acts just like a real thin, translucent object would solve a lot of problems, speed up work and improve render quality a great deal. Looking forward to seeing your attempts, and to reading the replies from ChaosGroup. Cheers!

Comment