Announcement

Collapse
No announcement yet.

Understanding DMC Sampler

Collapse
X
 
  • Filter
  • Time
  • Show
Clear All
new posts

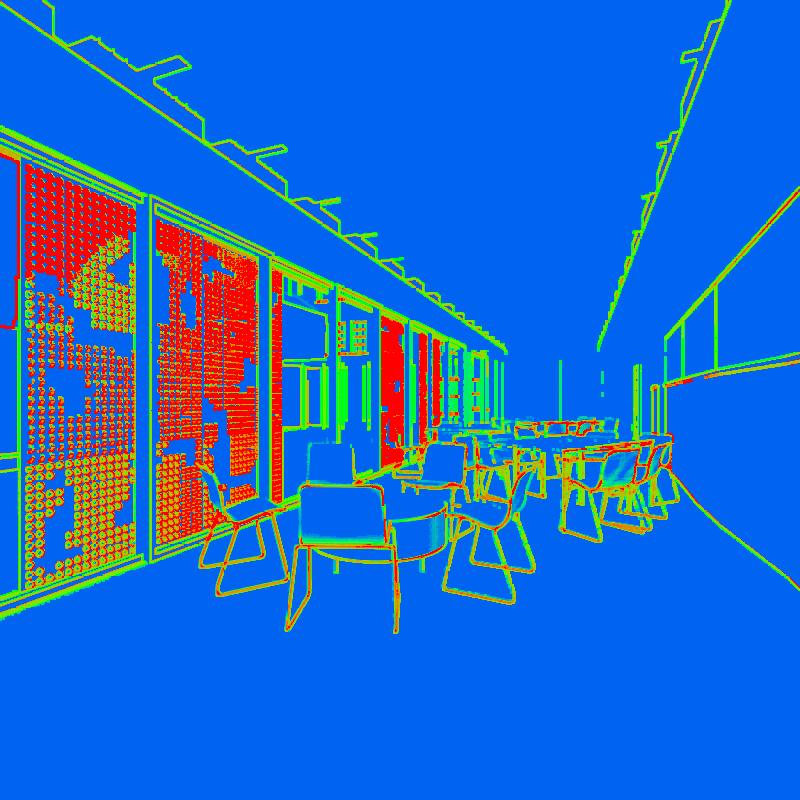
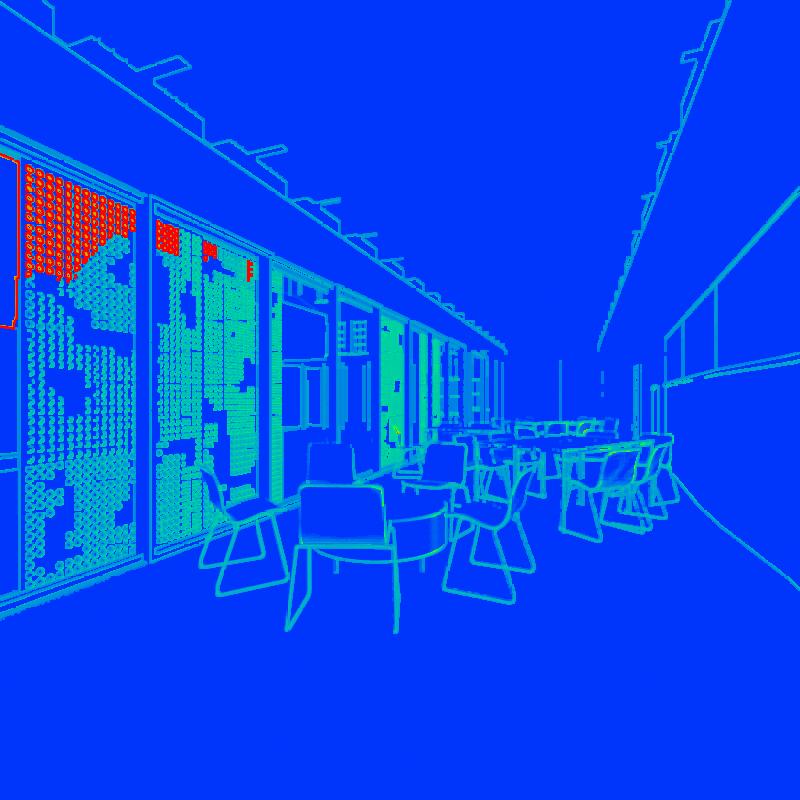
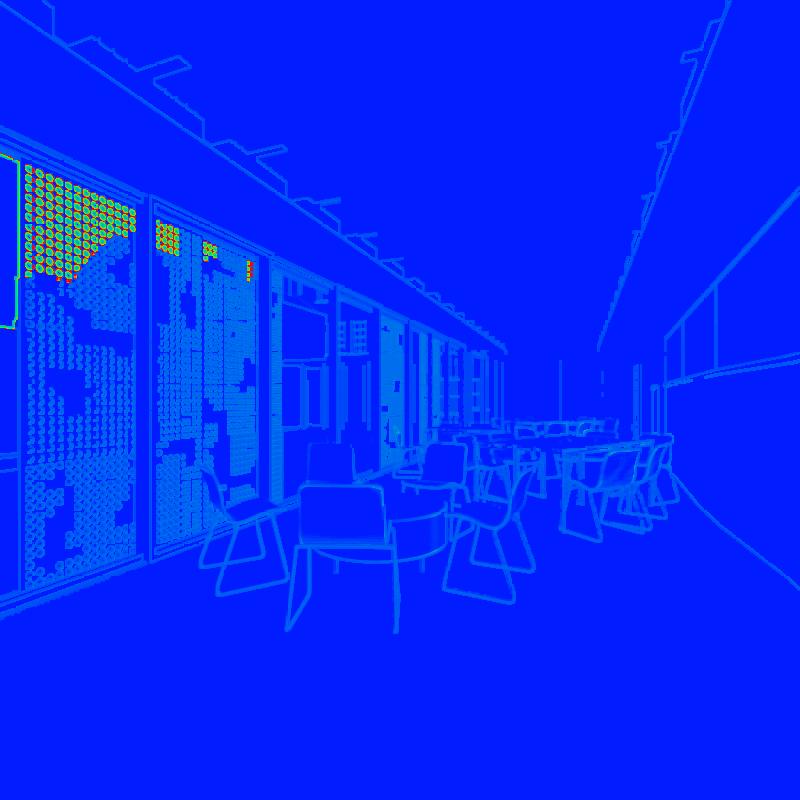
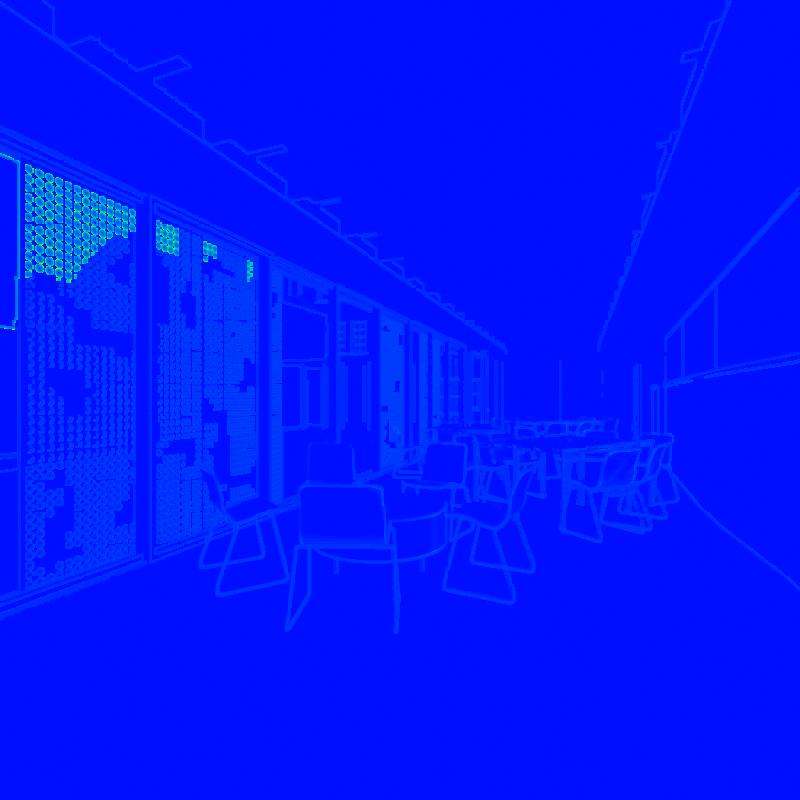
  • Right. Back to Step 1, so grey material, no lights, no GI. Here are my samplerate elements

    min 1 max 4
    Click image for larger version

Name:	dmc 1-4.jpg
Views:	1
Size:	94.7 KB
ID:	850334
    min 1 max 8
    Click image for larger version

Name:	dmc 1-8.jpg
Views:	1
Size:	68.8 KB
ID:	850335
    min 1 max 16
    Click image for larger version

Name:	dmc 1-16.jpg
Views:	1
Size:	50.5 KB
ID:	850336
    min 1 max 32
    Click image for larger version

Name:	dmc 1-32.jpg
Views:	1
Size:	36.1 KB
ID:	850337
    min 1 max 50
    Click image for larger version

Name:	dmc 1-50.jpg
Views:	1
Size:	27.9 KB
ID:	850338

    At what level would you stick?
    Kind Regards,
    Richard Birket
    ----------------------------------->
    http://www.blinkimage.com

    ----------------------------------->

    Comment


    • Could you pop up the beauty for each too at decent quality? It's all about whether the visual quality of the edges are good enough, in concert with the sample rate showing your how the aa is being used.

      Comment


      • Originally posted by joconnell View Post
        When you go to the turn on your lights stage, you only care about getting your lights clean for that 1/8 value, then you go to your materials.
        Should I turn on the lights AND gi at the same time, or work through the samplerate step for lights only first and only then turn on GI?
        Kind Regards,
        Richard Birket
        ----------------------------------->
        http://www.blinkimage.com

        ----------------------------------->

        Comment


        • Well, it kind of doesn't matter really - you're sticking at whatever aa rate you've gotten in step 1, you can use raw light and raw gi and judge the quality optically. The sample rate will again kick up a fuss until you clean your gi and light sampling and you'll probably end up with some new red areas around the lights and maybe some green areas where there's any soft shadow edges or crisp edges of light meeting dark.

          Comment


          • Originally posted by joconnell View Post
            Could you pop up the beauty for each too at decent quality? It's all about whether the visual quality of the edges are good enough, in concert with the sample rate showing your how the aa is being used.
            Not what I'd call beautiful, but here are the beauty passes. Not sure if I can tell much/any difference.

            min 1 max 4
            Click image for larger version

Name:	beauty 1-4.jpg
Views:	1
Size:	316.8 KB
ID:	850341
            min 1 max 8
            Click image for larger version

Name:	beauty 1-8.jpg
Views:	1
Size:	316.6 KB
ID:	850342
            min 1 max 16
            Click image for larger version

Name:	beauty 1-16.jpg
Views:	1
Size:	316.5 KB
ID:	850343
            min 1 max 32
            Click image for larger version

Name:	beauty 1-32.jpg
Views:	1
Size:	316.0 KB
ID:	850344
            min 1 max 50
            Click image for larger version

Name:	beauty 1-50.jpg
Views:	1
Size:	316.6 KB
ID:	850345
            Kind Regards,
            Richard Birket
            ----------------------------------->
            http://www.blinkimage.com

            ----------------------------------->

            Comment


            • In seeing little to no difference between my beauty passes, i opted for min = 1 max = 4 and rendered an 800x800pixel image with my lights and GI turnded back on, though still with a grey material. There is still a small amount of fine noise in the rawGI pass in the floor, but my thoughts are that this would be visually 'ironed out' with my stone floor texture anyway. To be honest, the samplerate element looks a bit minging, but the raw light looks ok to my eyes. This is with BF samples set to 64. I dare say doubling that would clean up the sample rate significantly. I will render and update.

              Click image for larger version

Name:	grey lights GI beauty.jpg
Views:	1
Size:	212.3 KB
ID:	850346Click image for larger version

Name:	grey lights GI rawGI.jpg
Views:	1
Size:	215.7 KB
ID:	850347Click image for larger version

Name:	grey lights GI rawlight.jpg
Views:	1
Size:	215.9 KB
ID:	850348Click image for larger version

Name:	grey lights GI samplerate.jpg
Views:	1
Size:	443.6 KB
ID:	850349
              Kind Regards,
              Richard Birket
              ----------------------------------->
              http://www.blinkimage.com

              ----------------------------------->

              Comment


              • Looking at them at 100% I think you're right - I cant tell much of a quality improvement from 1/4 in the edges so I'd say that there's no point in going beyond that or 1/8 - if you've got some really fine textures coming in later then they might be worth looking at quality wise but that's about it.

                Comment


                • Originally posted by tricky View Post
                  In seeing little to no difference between my beauty passes, i opted for min = 1 max = 4 and rendered an 800x800pixel image with my lights and GI turnded back on, though still with a grey material. There is still a small amount of fine noise in the rawGI pass in the floor, but my thoughts are that this would be visually 'ironed out' with my stone floor texture anyway. To be honest, the samplerate element looks a bit minging, but the raw light looks ok to my eyes. This is with BF samples set to 64. I dare say doubling that would clean up the sample rate significantly. I will render and update.

                  [ATTACH=CONFIG]16438[/ATTACH][ATTACH=CONFIG]16439[/ATTACH][ATTACH=CONFIG]16440[/ATTACH][ATTACH=CONFIG]16441[/ATTACH]
                  Yep, looking at that, the brute force is leaving dirt hence why you're getting green all the way through the ambient light areas. 96 or 128 and see how your speed and grain levels go.

                  Comment


                  • Originally posted by joconnell View Post
                    Yep, looking at that, the brute force is leaving dirt hence why you're getting green all the way through the ambient light areas. 96 or 128 and see how your speed and grain levels go.
                    So, while I render this out, a question:

                    If I am reasonably happy with the quality of the beauty pass with BF set at 64, would the fact that I am still seeing lots of red/green in the samplerate mean that when I begin to work on my materials, my setup would be rendering inefficiently (and therefore more slowly) than if I were to try and resolve the red areas with GI settings first?

                    Renders now complete, and here are the samplerate elements (all other settings the same):

                    BF = 96, rendetime 7mins9s
                    Click image for larger version

Name:	grey lights GI samplerate 96.jpg
Views:	1
Size:	411.1 KB
ID:	850352

                    BF = 192, rendertime 22mins41s (!)
                    Click image for larger version

Name:	grey lights GI samplerate 192.jpg
Views:	1
Size:	315.8 KB
ID:	850353

                    To me, this doesn't seem to be working well. This is using 6 high spec machines and I still only have a grey material applied.

                    I tried changing to min=1 max=16 (BF still at 192) and the time dropped to 5mins54s and the samplerate looks cleaner. Rawlight and RawGI look grainier though.

                    I tried changing to min=1 max=32 (BF still at 192) and is dropped to just over 2minutes, but the rawlight and rawGI are slightly grainer still, though the samplerate looks good.

                    This seems very counter-intuitive. the higher the maximum DMC value, the cleaner the samplerate and quicker the render. However, the grain in the rawlight and rawGI is greater.
                    Last edited by tricky; 15-11-2013, 09:45 AM.
                    Kind Regards,
                    Richard Birket
                    ----------------------------------->
                    http://www.blinkimage.com

                    ----------------------------------->

                    Comment


                    • Sorry, got caught in deadline render manager hell thing for a bit there - the main drive died in one of the servers so lots of juggling.

                      I think you're right - 1/4 wasn't giving vray a lot of options, 1/8 is a better bet for it to start being adaptive. 1/16 is probably undermining your brute force too much. Don't worry about the sample rate looking "clean" as such, the sample rate is purely a method to see what the AA is doing. I'll get back to you with a better run down of things later on, lots to do right now.

                      Comment


                      • Originally posted by tricky View Post
                        I tried changing to min=1 max=16 (BF still at 192) and the time dropped to 5mins54s and the samplerate looks cleaner. Rawlight and RawGI look grainier though.

                        I tried changing to min=1 max=32 (BF still at 192) and is dropped to just over 2minutes, but the rawlight and rawGI are slightly grainer still, though the samplerate looks good.

                        This seems very counter-intuitive. the higher the maximum DMC value, the cleaner the samplerate and quicker the render. However, the grain in the rawlight and rawGI is greater.
                        This is exactly what is to be expected... you're getting a faster render time at higher max AA values because increasing your max AA setting is in fact giving you a noisier render (as you're noticing from the increasing grain in the rawlight and rawGI passes)... not very intuitive right?

                        Just remember that every time you increase your Anti-Aliasing settings, the rest of your scene's sample settings are automatically being reduced by V-Ray's formula to compensate. You can see this clearly happening when you input your scene's settings into the calculator provided HERE)

                        Whenever you increase your Max AA value, it divides all the other subdivisions (lights, materials, etc) throughout your entire scene by this higher and higher value... eventually dropping the number of samples taken of your lights, materials, etc, to only 1 per AA sample.
                        Akin Bilgic | CGGallery.com
                        Modeler & Generalist TD

                        V-Ray Render Optimization
                        V-Ray DMC Calculator

                        Comment


                        • Here's another example to explain what joconnell and I are talking about.
                          Again this scene is just a sphere with glossy reflection, lit by a dome light with an HDRI. All other settings at their defaults.

                          Render #1: 1/8 AA and 8 SubDs in the Light and Material each.


                          With this Render, you're telling V-Ray:
                          "You can use anywhere between 1 or 64 (8 subdivs) Primary Samples (AA) to figure out what's going on in this scene and reduce the noise as close as you can to my specified noise threshold... BUT for each of those primary samples you take, you're only allowed to take 1 additional Secondary Sample to figure out what's going on with the lighting and material each."
                          (Remember that even though the light and material settings are set to 8 Subdivisions (64 samples) - this value is being divided by the AA Max setting of your scene - so instead of 64 samples for the light and material, the value is in fact divided all the way down to only 1 sample. (64 Secondary Samples / 64 Primary Samples = 1 Secondary Sample) You can confirm this yourself by plugging these numbers into the calculator)


                          So V-Ray starts working and finishes shortly after. It hands you the best image it was able to manage... but also warns you (through the SampleRate render element's red areas):
                          "I wasn't able to figure out what's going on in this scene according to the level of quality (noise) you want it to be at! - 64 Primary Samples with 1 Secondary Sample per light and material didn't give me enough information!"

                          You take a look at the image, and while the edges of objects are nice and defined, there is indeed noisy parts of the image. Through further investigation (by looking at more render elements like RawGI, RawLighting, RawReflection, etc) You see that the noise seems to reside entirely in the lighting or material passes.

                          So you've got this noisy image, and you can decide to do two things to reduce the noise to meet your desired level of quality (noise threshold):
                          1- Increase AA Max - Let V-Ray take more Primary Samples, but again take only 1 additional Secondary Sample for the lighting & material each per primary sample.
                          2- Increase Light & Material Subdivs - Have V-Ray take the same amount of Primary Samples, but let it take more Secondary Samples with each primary sample to better figure out what's happening with those specific aspects of the image.

                          We know that the edges of objects in our image are nice and clean (which is what the Primary Samples (AA) specializes in) - so it doesn't make much sense to just keep taking Primary Samples until it finally fixes the noise in our scene... which it eventually will, but may take a long time. Instead we also have Secondary Samples at our disposal... which are specialized in cleaning up the exact type of noise we have in our scene - in the lighting and material reflection. So the choice is fairly logical (why use a screwdriver to do a hammer's job?) - we'll use more Secondary Samples to try to reach the noise threshold we want. So we set render #2:


                          Render #2: 1/8 AA and 100 SubDs in the Material and Light each.


                          With this Render, you're telling V-Ray:
                          "You can use anywhere between 1 or 64 (8 subdivs) Primary Samples (AA) to figure out what's going on in this scene and reduce the noise as close as you can to my specified noise threshold... AND for each of those primary samples you take, you're allowed to take up to 156 additional Secondary Samples to figure out what's going on with the lighting and material each."
                          (Again, remember that even though the light and material settings are set to 100 Subdivisions (10000 samples) - this value is being divided by the AA Max setting of your scene - so instead of 10000 samples for the light and material, the value is in fact divided all the way down to a max of 156 samples. (10000 Secondary Samples / 64 Primary Samples = 156 Secondary Sample) You can confirm this yourself by plugging these numbers into the calculator)


                          So V-Ray starts working and finishes shortly after. It hands you the best image it was able to manage... and tells you (through the SampleRate render element):
                          "I was able to figure out almost all of what's going on in this scene according to the level of quality (noise) you want it to be at! - 64 Primary Samples with 156 Secondary Samples per light and material gave me plenty of information! And because the Secondary Samples supplied the Primary Samples with a lot more information this time, I didn't even have to use all 64 Primary Samples most of the time to figure it out!"

                          You take a look at the image and the noise is fixed. You've got yourself a fairly nice clean render.
                          A render that is cleaner and finished faster than if you had instead chosen to keep increasing the Primary Samples (Max AA) to fix the noise.
                          Last edited by RockinAkin; 21-11-2013, 11:44 AM.
                          Akin Bilgic | CGGallery.com
                          Modeler & Generalist TD

                          V-Ray Render Optimization
                          V-Ray DMC Calculator

                          Comment


                          • Nicely done Akin.

                            Comment


                            • Originally posted by joconnell View Post
                              Nicely done Akin.
                              amen .
                              www.peterguthrie.net
                              www.peterguthrie.net/blog/
                              www.pg-skies.net/

                              Comment


                              • Thanks. DMC Sampler for Dummies.

                                Comment

                                Working...
                                X