 Tweet
Tweet
I changed only a few things in your scene, here's a quick list with the reasoning (in bold the change made)
Linear Workflow is your friend.
Forget Ambient lighting: use a domelight instead (yes, for white too.). Ambient to black, added a domelight with vraySky map in it.
Linear Workflow is your friend.
It's not helping to set the sun above 1.0 multiplier, its intensity is so big that the energy carried by the rays becomes very very difficult to extinguish, especially with 100 bounces (LC) around glossy surfaces (CFR. fireflies). Set the sun mult. back to 1.0
Linear Workflow is your friend.
Setting a burn of 0.0 in the color mapping for Rehinard, and then not applying gamma means you've skewed so far away from the radiometrically linear light transport equation that the results are haphazard.
To compensate for the (not-so)soft clip Rehinard introduces, you end up making the sun brighter, and likley also the surfaces, lights, and so on and so forth (Cue the Override shader applied on the walls at 222 out of 255 white, or with an albedo shy of 90%...).
Without sub-pixel mapping, and baked color mapping, that WILL lead to fireflies, and although the may LOOK faint in the render, they will not clean no matter the sampling: the energies those specific rays carry are very unnatural.
To check this, simply set Burn to 1.0, and turn the gamma button on in the VFB: that is what V-Ray is being asked to process, regardless of what you're seeing in the VFB.
I chose NOT to change your colormapping settings, but i re-exposed the camera to compensate for the brighter environment (you had a 1.0 float as ambient lighting.).
Linear Workflow is your friend.
You will have noticed that under your present colormapping conditions, also the camera exposure is non-linear.
Linear Workflow is your friend.
The non-linearity of the scene setup also forced you to (needlessly) raise the LC subdivs, and try and correct the fireflies with custom irmap settings.
I reverted to BF/LC with default settings for both methods, while i didn't touch the general GI settings at all.
While rendering, i noticed vray would spend loads of time in the cutout parts which were pitch black.
I turned off the camera clipping, and used a vrayclipper object with a black vraylight material applied. I also turned off the shell modifier on $Line137 so to make the cutout solid.
These cured the issue, V-Ray not spending more than 1 ray per pixel on the black, however there are still some odd artifacts i couldn't cure in the bottom right part, which cost rendertime (see the samplerate RE).
Last, but not least, you should always make doubly sure your noise octaves aren't leading to variations many times within a pixel.
Renderman automatically clamps at the Nyquist Limit, we do not, and as in your case, while not the source of the fireflies, it surely made it more difficult for VRay to converge those very densely varying normals coupled with such high-intensity rays.
Either use an override with a lightmaterial and the noise you're sizing up as map, or use a bumpNormals RE to see if your bumps are making an appreciable difference, with distinct patterns, or if you're changing the normals (many times) per pixel.
I left them on for the final render, but i can see no difference either way (I debugged the scene with bump off entirely), while a part of the computation time will be there whether you see the effect or not.
The final result was the attached image, in 5 minutes 12 seconds on my amd fx-8350 (don't laugh! ^^).
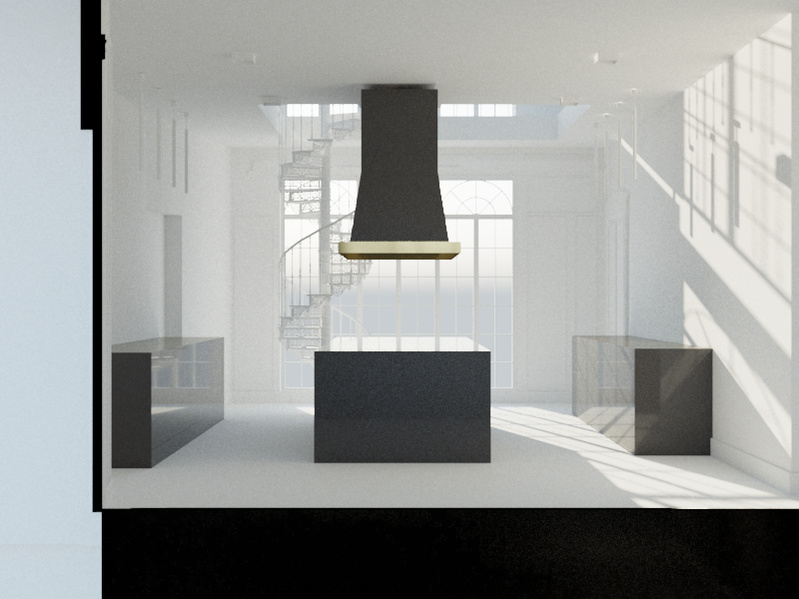
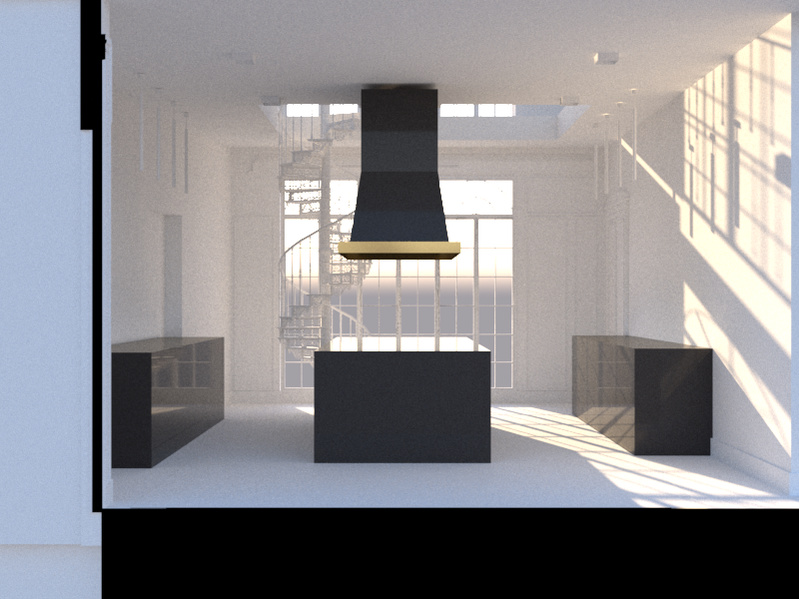
For the render below, I also reset the settings to both reset the colormapping and to enable the sp3 sampler.
Ofc, i also had to re-expose the camera (down, by a wee bit.)
That's the scene i attached, btw, which rendered for 2:31 (i didn't bother matching noise levels, and went for a quick render.).
Feel free to expose it up, or change its white balance: the contrast will not change, as you're in linear a workflow, now.
Or as you should know by now, in the hands of a Friend.
DEbug_noise_Vlado-Lele01.zip
Linear Workflow is your friend.
Forget Ambient lighting: use a domelight instead (yes, for white too.). Ambient to black, added a domelight with vraySky map in it.
Linear Workflow is your friend.
It's not helping to set the sun above 1.0 multiplier, its intensity is so big that the energy carried by the rays becomes very very difficult to extinguish, especially with 100 bounces (LC) around glossy surfaces (CFR. fireflies). Set the sun mult. back to 1.0
Linear Workflow is your friend.
Setting a burn of 0.0 in the color mapping for Rehinard, and then not applying gamma means you've skewed so far away from the radiometrically linear light transport equation that the results are haphazard.
To compensate for the (not-so)soft clip Rehinard introduces, you end up making the sun brighter, and likley also the surfaces, lights, and so on and so forth (Cue the Override shader applied on the walls at 222 out of 255 white, or with an albedo shy of 90%...).
Without sub-pixel mapping, and baked color mapping, that WILL lead to fireflies, and although the may LOOK faint in the render, they will not clean no matter the sampling: the energies those specific rays carry are very unnatural.
To check this, simply set Burn to 1.0, and turn the gamma button on in the VFB: that is what V-Ray is being asked to process, regardless of what you're seeing in the VFB.
I chose NOT to change your colormapping settings, but i re-exposed the camera to compensate for the brighter environment (you had a 1.0 float as ambient lighting.).
Linear Workflow is your friend.
You will have noticed that under your present colormapping conditions, also the camera exposure is non-linear.
Linear Workflow is your friend.
The non-linearity of the scene setup also forced you to (needlessly) raise the LC subdivs, and try and correct the fireflies with custom irmap settings.
I reverted to BF/LC with default settings for both methods, while i didn't touch the general GI settings at all.
While rendering, i noticed vray would spend loads of time in the cutout parts which were pitch black.
I turned off the camera clipping, and used a vrayclipper object with a black vraylight material applied. I also turned off the shell modifier on $Line137 so to make the cutout solid.
These cured the issue, V-Ray not spending more than 1 ray per pixel on the black, however there are still some odd artifacts i couldn't cure in the bottom right part, which cost rendertime (see the samplerate RE).
Last, but not least, you should always make doubly sure your noise octaves aren't leading to variations many times within a pixel.
Renderman automatically clamps at the Nyquist Limit, we do not, and as in your case, while not the source of the fireflies, it surely made it more difficult for VRay to converge those very densely varying normals coupled with such high-intensity rays.
Either use an override with a lightmaterial and the noise you're sizing up as map, or use a bumpNormals RE to see if your bumps are making an appreciable difference, with distinct patterns, or if you're changing the normals (many times) per pixel.
I left them on for the final render, but i can see no difference either way (I debugged the scene with bump off entirely), while a part of the computation time will be there whether you see the effect or not.
The final result was the attached image, in 5 minutes 12 seconds on my amd fx-8350 (don't laugh! ^^).
For the render below, I also reset the settings to both reset the colormapping and to enable the sp3 sampler.
Ofc, i also had to re-expose the camera (down, by a wee bit.)
That's the scene i attached, btw, which rendered for 2:31 (i didn't bother matching noise levels, and went for a quick render.).
Feel free to expose it up, or change its white balance: the contrast will not change, as you're in linear a workflow, now.
Or as you should know by now, in the hands of a Friend.
DEbug_noise_Vlado-Lele01.zip

Comment